* We recommend using an email address that can be accessed by multiple people in your company, such as your support email or your About email. If you don't have a company email address, create one first.
Open this page to create your Apple ID.
Fill out the form and enter your company email address.
This email address will be your new Apple ID. Apple will send important messages, actions, or decisions regarding your app to this email address. Therefore, please check this mailbox regularly.
You will receive a 6-digit verification code by email. Enter this code in the pop-up window that opens.
The code will expire within 3 hours after the email is sent.
Your Apple ID has now been created.
Please note that creating an Apple ID and creating an Apple Developer account are NOT the same thing.
A D-U-N-S number, which stands for Data Universal Numbering System, is a unique nine-digit identification number assigned to a business entity by Dun & Bradstreet (D&B), a prominent business data and analytics company. The purpose of a D-U-N-S number is to provide a standardized and globally recognized identifier for businesses, allowing them to be easily identified and tracked in various databases and business transactions.
You can apply for your D-U-N-S-number for free - if your company is not from Germany, Austria or Switzerland look ukönnen Sie Ihre eigene D-U-N-S-Nummer kostenlos beantragen:
The process to receive your D-U-N-S number can take up to 30 days, so take this step as soon as possible. (However, experience shows that it is usually much faster).
Once your Apple ID is created, open the "Apple Developer Program Enrollment"-page.
Click Start Your Enrollment and sign in with your new Apple ID.
Read and agree to the Apple Developer Agreement. Click Submit.
Ihr Apple Developer Program öffnet sich jetzt. Wählen Sie das Feld "Join the Apple Developer Program" (Dem Apple Developer Program beitreten) auf der "Welcome"-Seite aus und klicken Sie auf der nächsten Seite auf Enroll (Anmelden).
In the “I develop apps as” field, select Company / Organization as your entity type. Click Continue.
On the next page, enter the information about your company and click Continue
Select "My organization has given me the authority ..." so that Apple can contact an authorized employee of your company instead of the owner/founder to verify your enrollment. Enter this employee's contact information as the "Verification Contact". Be sure to add an available phone number.
Legal Entity Name
Ihr Firmenname inklusive der Firmenform wie GmbH, AG, KG, oHg etc.
Website
Your company website
Headquarters Phone Number
Enter a phone number where Apple can reach you.
Apple WILL call you to verify your enrollment. If you are the founder / owner, make sure you enter an accessible number.
Your Work Email
5. Check your login details on the next page. If everything is correct, click Submit.
Within the next two weeks, Apple will call the "Verification Contact" or your "Headquarters Phone Number" to verify the enrollment. Please make sure that the appropriate person is informed.
Once verification is complete, you will receive a confirmation email to your Apple ID email address. This confirmation email will contain a link that you can use to confirm and pay for your Apple Developer Program membership.
Click Review Now in the email. This opens the “Review and Accept”-page.
Log in with your Apple ID and password you created in step 1.
Accept the Apple Developer Program License Agreement by selecting the checkbox at the bottom of the page and clicking Continue.
On the next page, review your purchase details and select the Automatic Renewal option.
If Automatic Renewal is not used, please create a reminder to renew your Apple Developer Program membership each year. Your app will be removed from the App Store within 24 hours after your membership expires.
You will be redirected to the App Store. Sign in with your Apple ID and password.
On the next page, pay €99 with your credit card and click Continue.
Accept the Terms & Conditions and click Continue. Follow the on-screen instructions until you see the "Thank you" page.
You have successfully enrolled in the Apple Developer Program. Within the next hour, you will receive 2 welcome emails and a payment confirmation from Apple to your Apple ID email address.
You will be notified on the email address you have associated with your Apple ID.
Your actual app will be in your App Store Connect account later. To be able to create your app in App Store Connect for the first time, publish it and perform app updates every now and then, we need an account for this as well.
Log in to App Store Connect and click Users and Roles → Plus-Icon (to the right of Users).
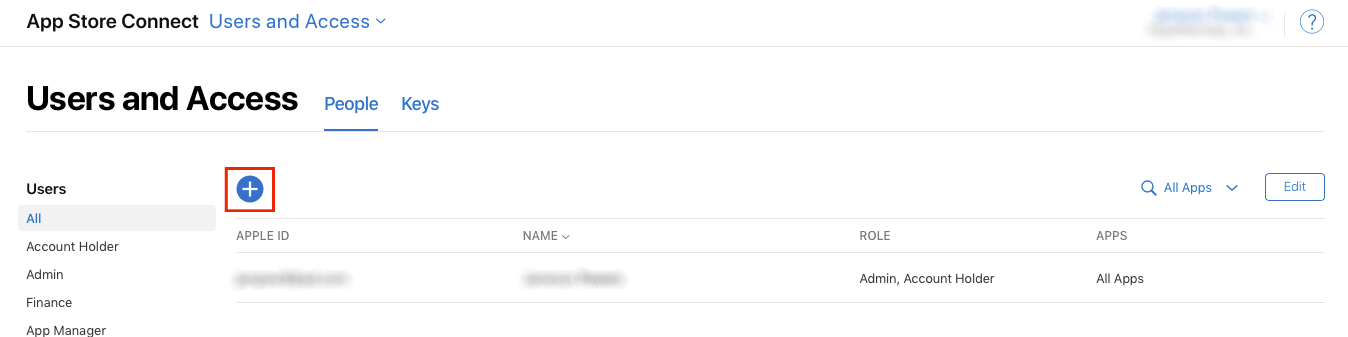
The "Add App Store Connect User" page opens. Enter the user information for ovos and click Next.
First name: ovos
Last Name: media
E-Mail: [email protected]
Select "Admin" (best case) or "App-Manager" (at least) as user role
In the Developer Resources section, select the Access to Certificates, Identifiers & Profiles checkbox and click Invite.
The ovos app team will now receive an email and accept the invitation shortly.
The API key is necessary to automatically send new updates for your app to the AppStore.
To simplify our three-week releases, I would need a so-called "API Key" from you, which can be created in AppStore Connect (https://appstoreconnect.apple.com/). Here is a short step by step guide.
Step: Log in to AppStore Connect with an admin account.
Step: Selects the "Users and access" field.
Step: Click on the "Integration" tab in the top row (next to the large "Users and access" heading)
Step: Click on the + button to add a new key.
Step: Selects "App Manager" as role
Step: The key is created. Save the file and copy the Key-ID and the Issuer-ID.
The APN key is necessary for sending push notifications.
Go to https://developer.apple.com/account/resources/authkeys/list
Click on "Keys" in the left bar
Then click on the blue button with the white plus.
Then select "Apple Push Notifications services (APNs)".
Just download the file - normally it's called AuthKey_***********.p8. The stars represent your Key-ID, so please don't rename it and just download the key
To make it easier for us to publish your app, we recommend that after you set up your AppStore account, you send us the following information to the Release Manager. (Dominik Kurcsics, [email protected])
Apple ID
The ID you've created in step 1
Team Name, Team ID
You can find these details under "Developer Account -> Membership"
API-Key (a tiny *.p8-file)
Issuer-ID
Key-ID
APN-Key (a tiny *.p8-file)